tiny house

One Year Anniversary!

Halloween marked the one year anniversary of when I started the adventure of moving into my house! I invited friends over for a party the day before but due to a crazy wind and rainstorm I postponed until the following week which provided more accommodating weather for tours and sharing stories and s'mores by a fire :)
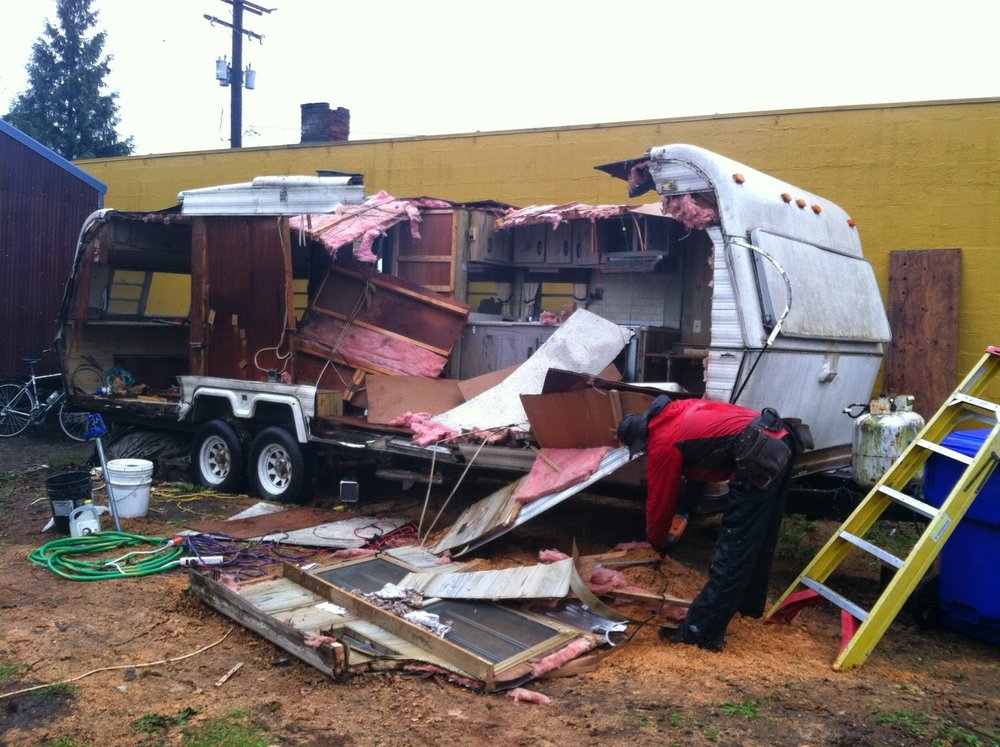
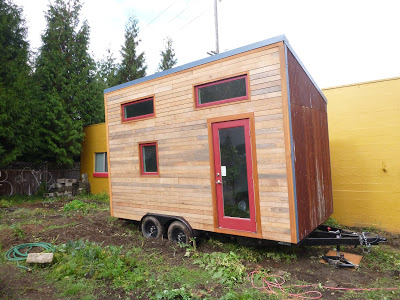
Last year, it started raining about two weeks before my move which was not an issue at my build site since I was building on asphalt and transportation was easy on the city streets. The difficult part was getting it into the yard on soft garden ground into it's place. You can read more about all of that here. After four days of moving and settling it on a sound foundation, I moved in!
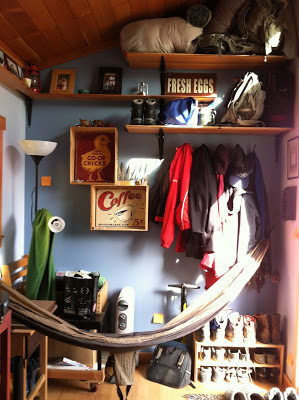
Within a few weeks, I had a couple of friends in town spend the night so I put up some temporary shelving to get things off of the floor to clear a space for me to sleep while they slept up in my loft. Luckily they are also outdoors people and didn't mind the chaotic accommodations.
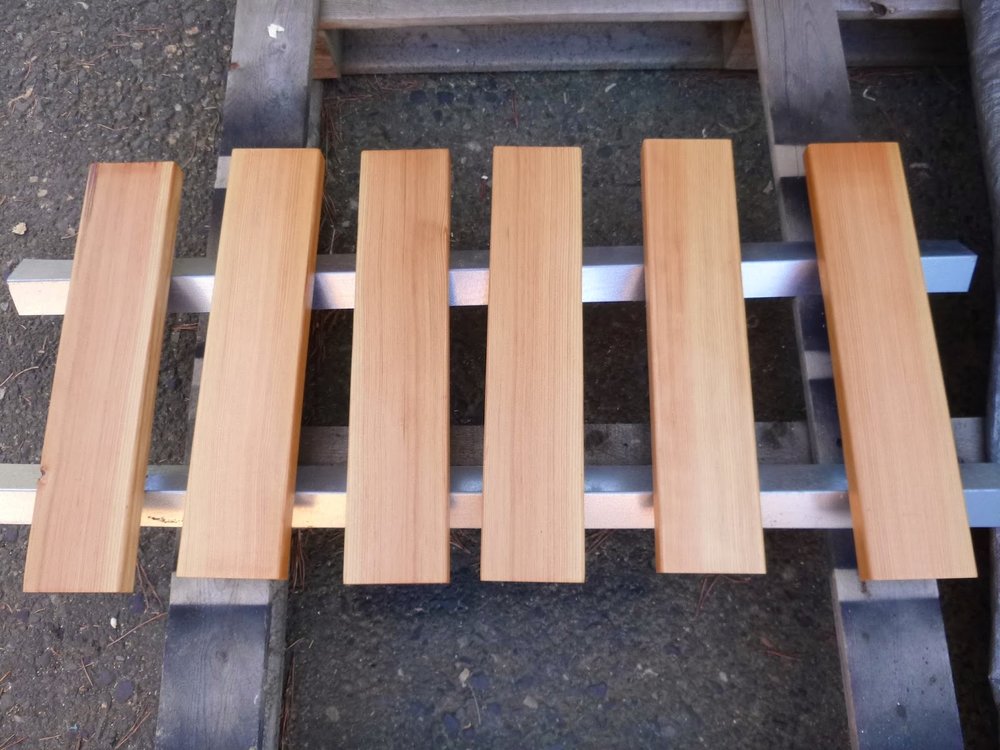
Since I had spent all of the money I saved to start the build, I took a little break from projects until January when I installed plumbing and finished out my bathroom. I used the compost toilet I found at the ReStore until I had an overflow issue and then needed to rebuild it. I used some inexpensive cedar fence boards to build a new box but it wasn't all that functional for various reasons so I continued to use the shop bathroom. In the last few weeks I finally rebuilt the toilet to a more functional and aesthetically pleasing design so I am excited to be able to use it now that the rainy season is back.
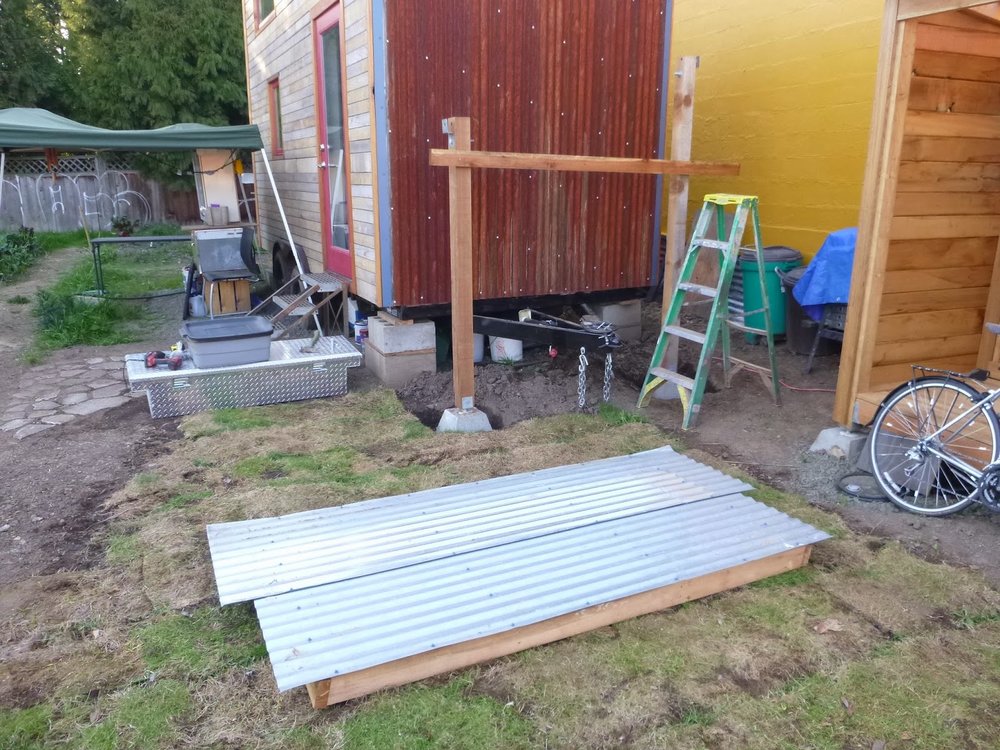
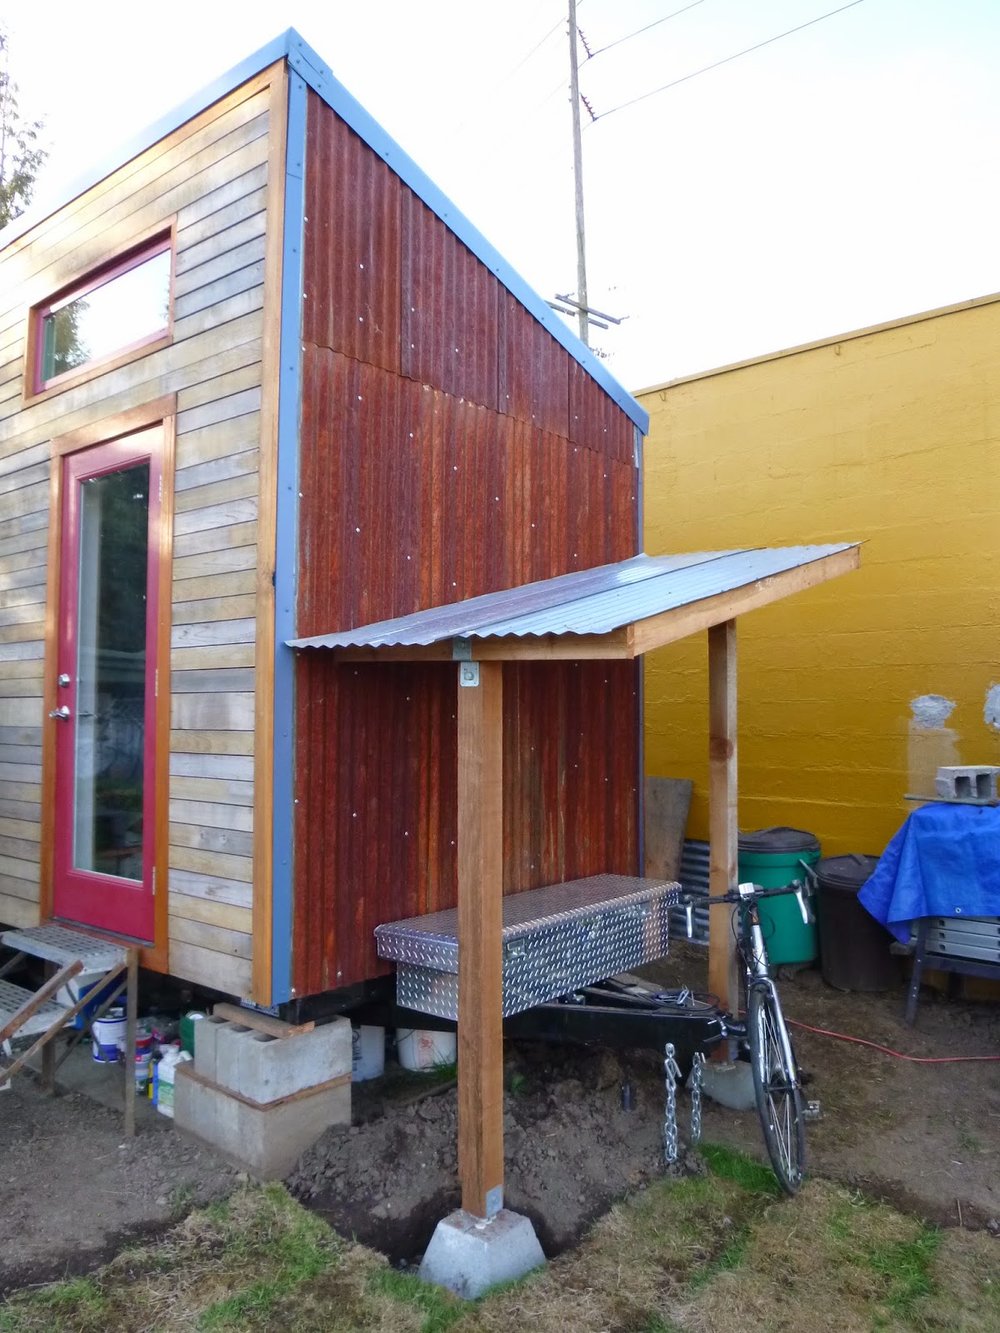
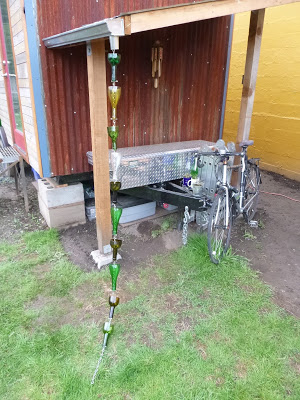
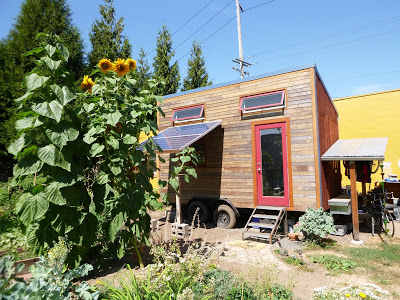
Speaking of rainy season, I am really grateful for the gutters and rain chain I added to help direct rain away from my house, not to mention how cool the recycled glass bottle chain funnels water to the ground. My polycarbonate awning is also welcomed in providing a more sheltered entry to my house. I needed to add some flashing above it to help prevent water from pooling up behind the siding and entering my house through capillary action via my door frame. I also built a covered bike and tool storage area with another shed roof on the trailer tongue. Moving my tools out of my house freed up a good amount of space since about half of my possessions are tools and outdoor gear!
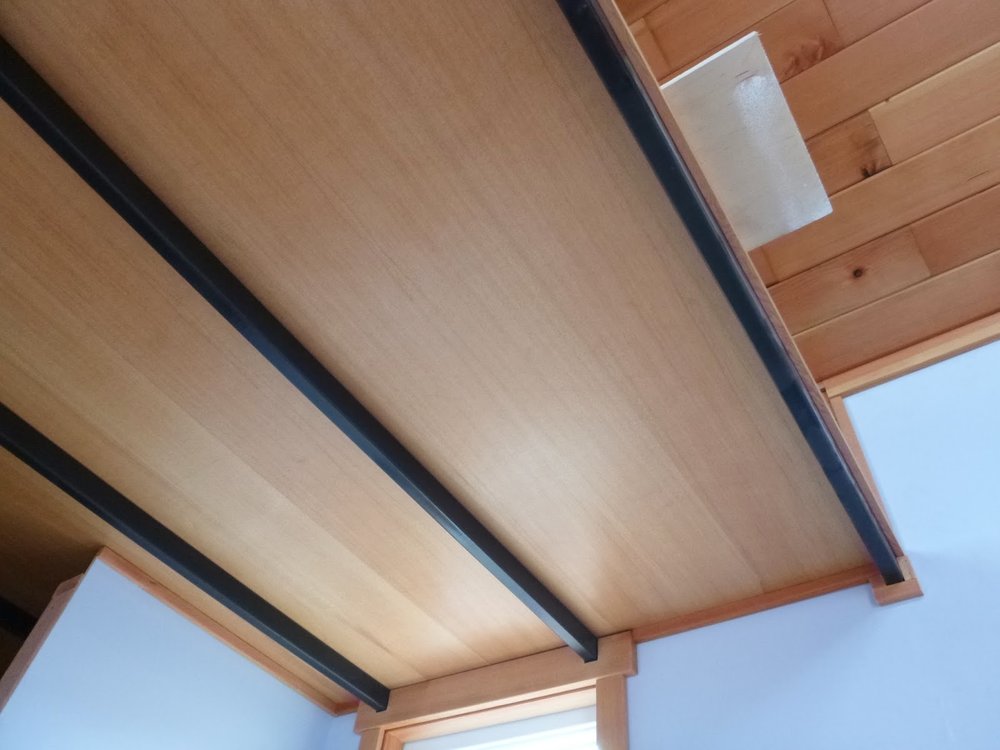
I added rock holds to ease loft access, new "great room" shelving in the form of fruit crates, and a full size digital piano that I hope to loosen up my rusty fingers on more this winter and beyond.
In May we wired up my house for AC power but it wasn't until June that we ran power out to the yard shed where I could finally plug in and turn on my fridge and water heater. In August, I added a small battery based solar system that powers the electronics and lights in my loft and could power my great room light and outlets in the future if I want or need to be off grid. (I would need to swap out the water heater and fridge for RV/boat style propane appliances and figure out my cooking situation if I could cook outside on my RV range or grill year round.)
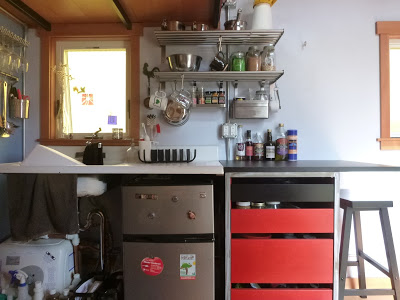
I learned how to weld in May and built a kitchen cabinet frame which was finished out with drawers and slides in September by a cabinet maker friend who works in the shop next door. I also built a small cabinet with one shelf for the left side of my sink (next to the bathroom wall) to fill in the gap which had been designed for a double basin sink before I found my awesome farm sink!
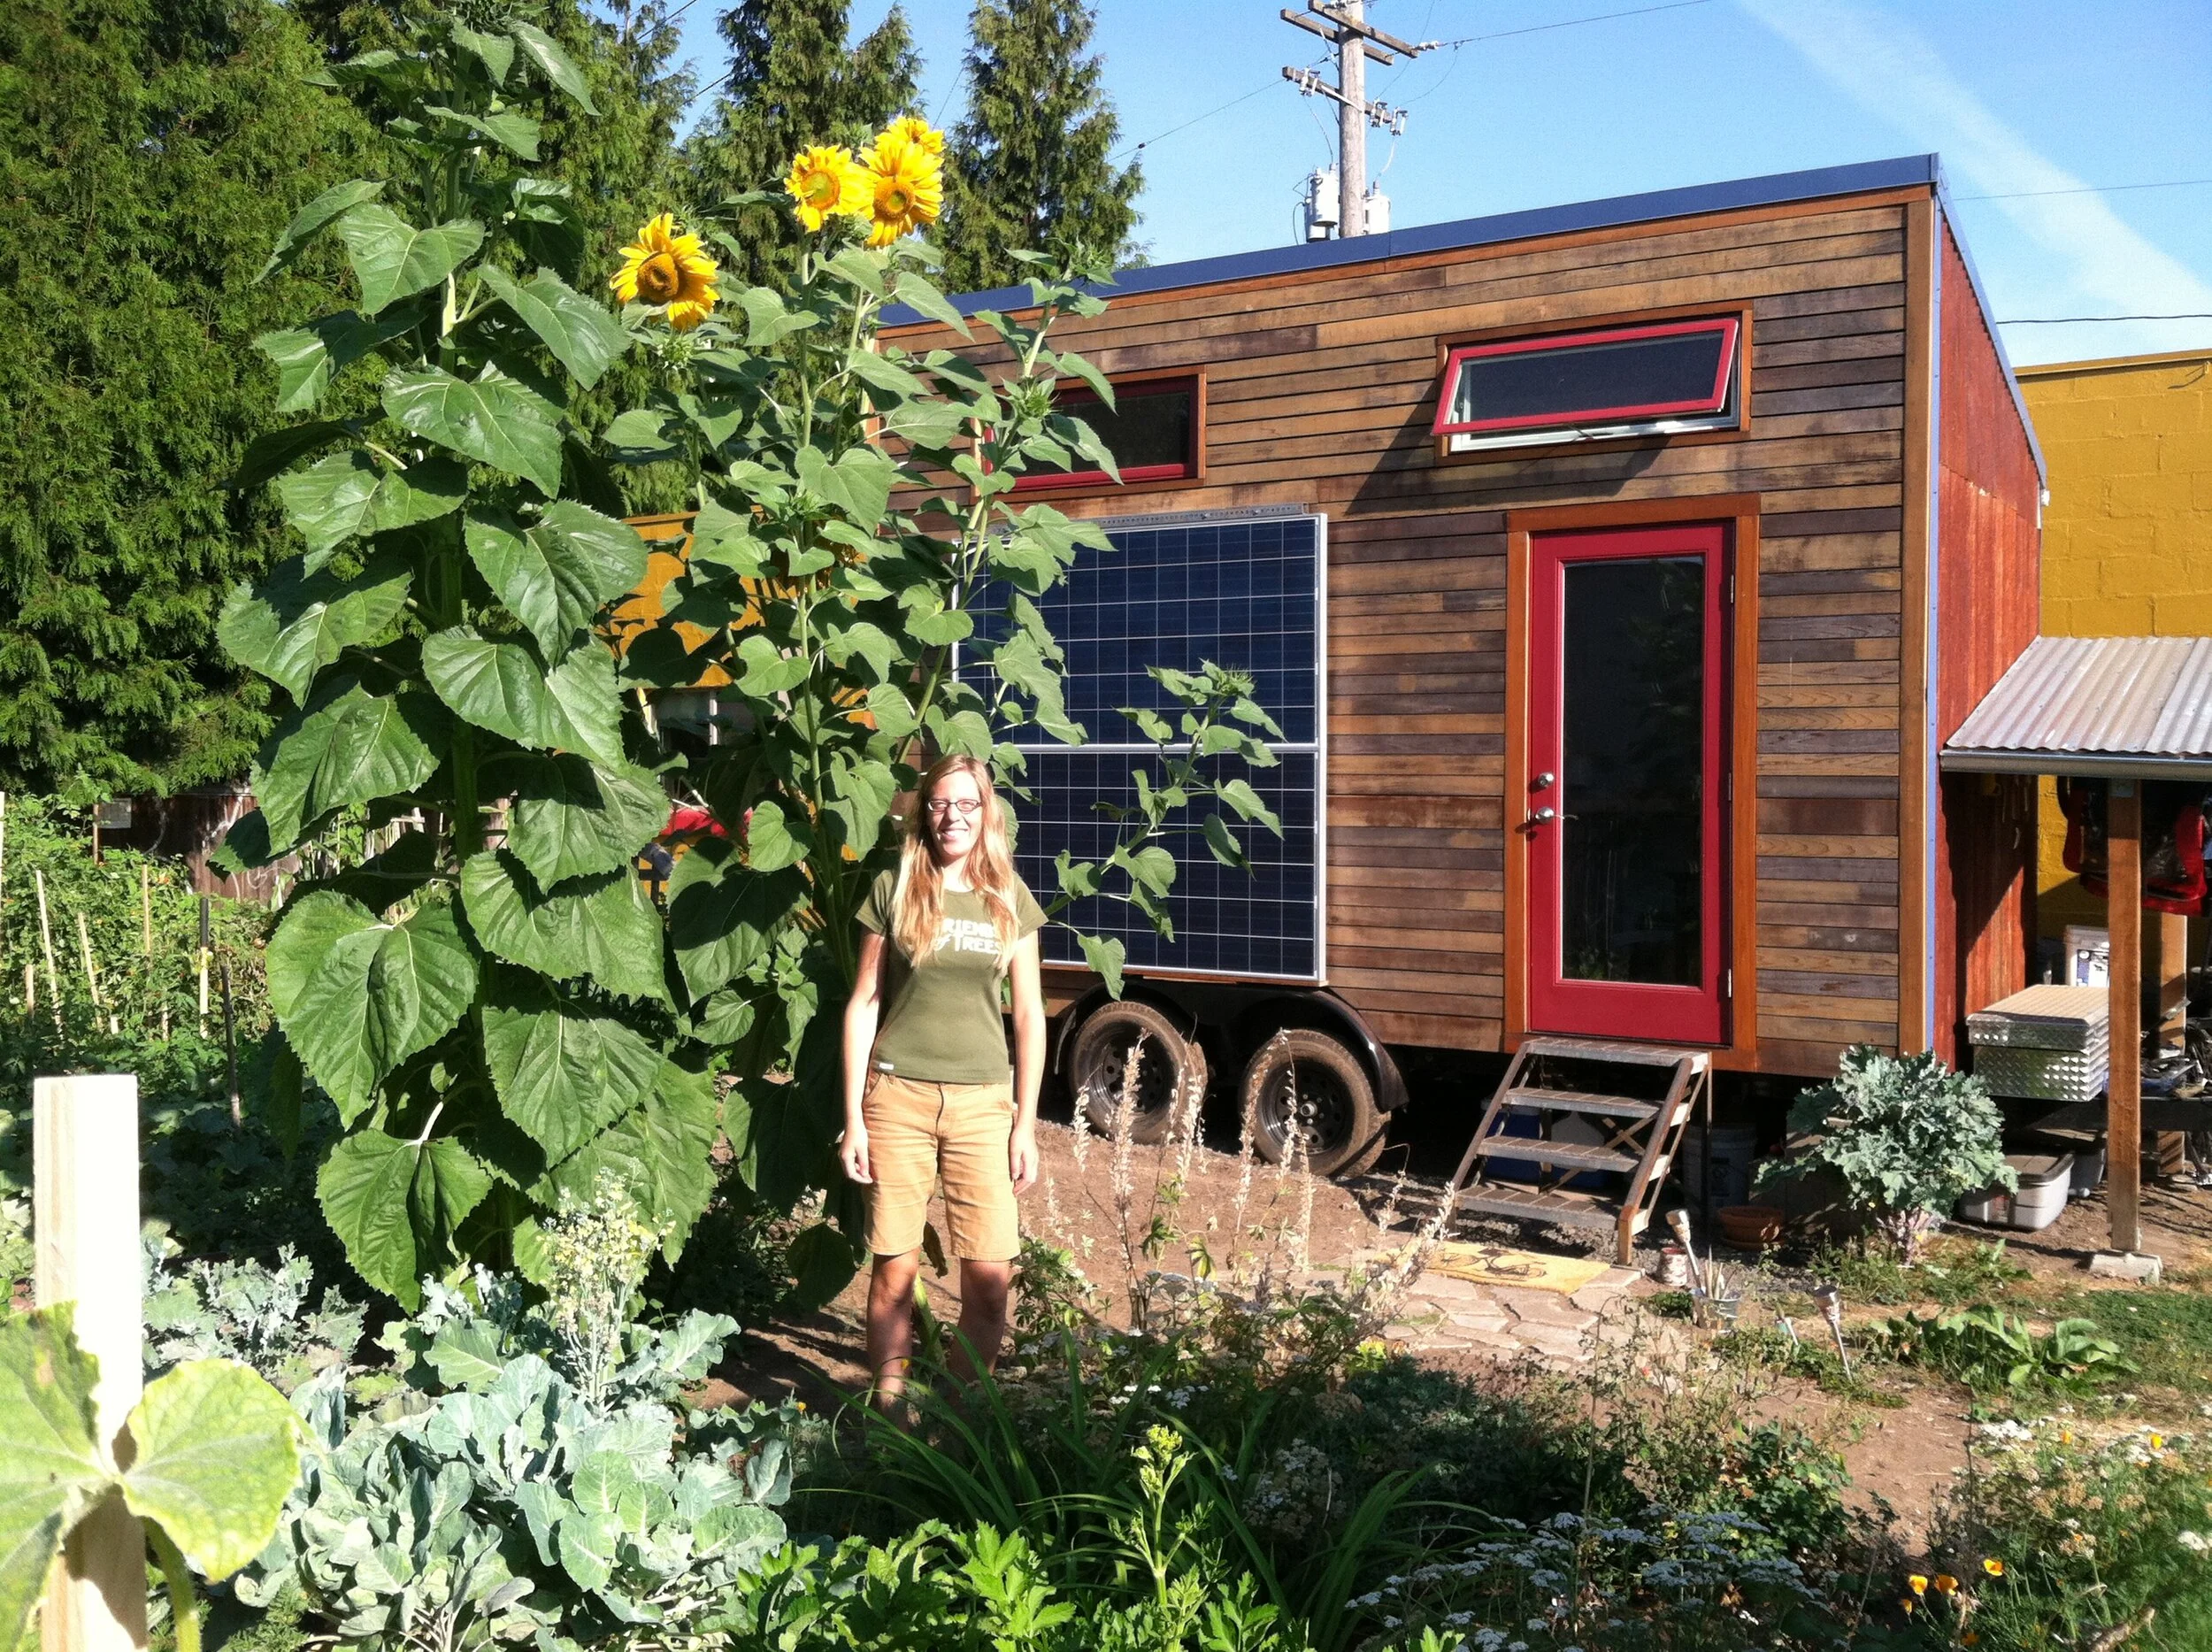
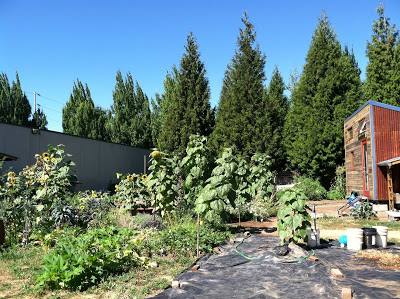
Outside, it's been a bountiful year in the garden (my first time as the primary gardener for a large space). I grew native wildflowers, strawberries, blueberries, raspberries,pees, green beans, beets, parsnips, carrots, broccoli, Brussels sprouts, kale, chard, cabbage, lettuce, cucumber, tomatoes, basil, corn and squash (so much squash...). Giant sunflower volunteers grew to over 10' tall! And of course there was much watering and weeding...the morning glory, thistles, dandelions, wild peas, wild onions, blackberries and quack grass really wanted to take over the yard but not this year...
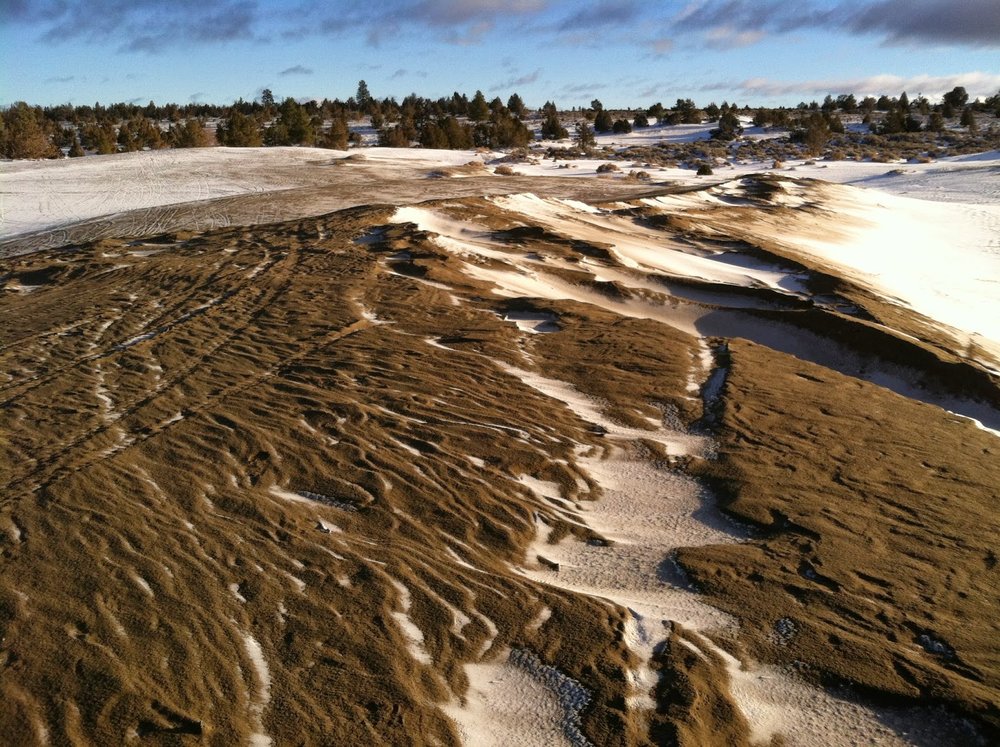
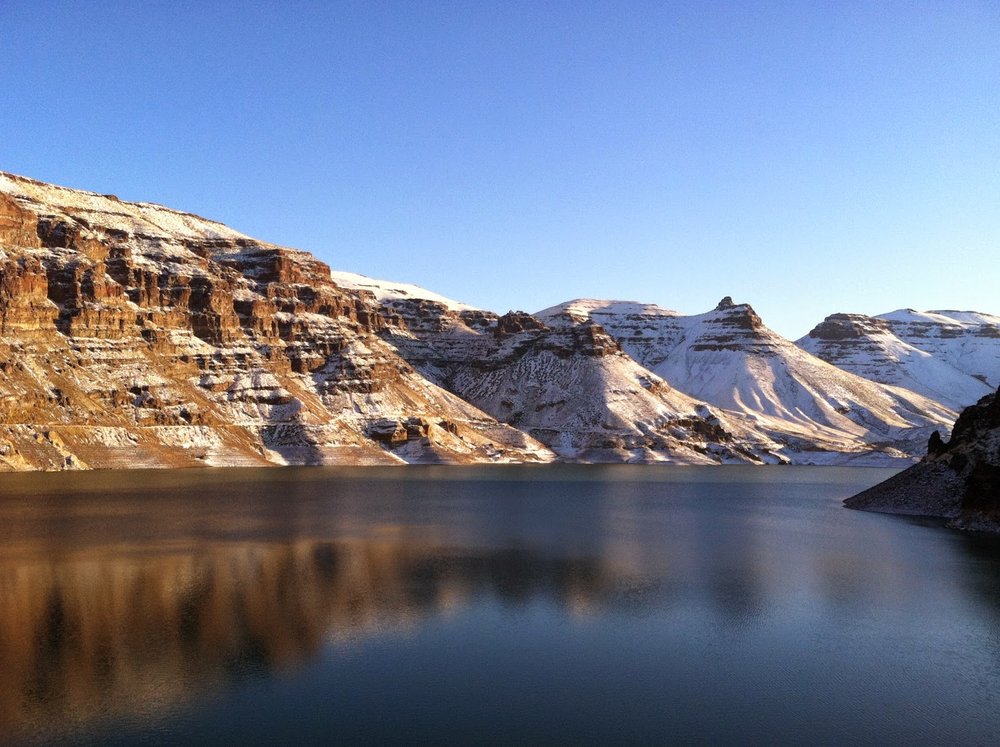
I have changed jobs a few times from doing home performance audits, sales and project management to a summer outreach and canvassing position promoting the urban forest and now to solar installs! I continue to volunteer for my favorite non-profits: Friends of Trees, Portland Fruit Tree Project and Community Cycling CenterI also found time to play outside more this year, mainly in the form of hiking. Here's to the next year!
As always, you can check out my fickr for more photos!

Directing Water: Gutters and Rain Chains

Well, this spring weather has certainly lived up to its often called schizophrenic nature with the number of dry windy days mixed with pouring buckets rainy days and very few of the typical Portland grey drizzle days. I finally decided my house was due for a gutter installation to help direct water away from the perimeter. I planned my house to have a rain screen and no overhangs since water is going to get behind the siding anyway in a climate like the PNW and because a 3" overhang will not do much to provide protection below. There is some debate about whether or not the roof can extend wider than the road legal limit but when I'm towing my house down the road, I don't want to worry about the overhang hitting things.

I probably should have put more thought into gutters when I was installing my metal roof but I wanted to wait to see what would happen with rain runoff without them. Since my house has a shed roof which slopes to the back, the water dripping off of the roof usually has enough momentum on the metal surface to shoot off and land away from my house. But some of the water drips from the roof down the siding, hitting the windowsills and the fenders. The splashback from the fenders has been somewhat worrisome so that is why I thought a gutter on the backside of my house would help. While it does help, rain has a way of falling in all kinds of directions and it looks like I will need to spend some more time problem solving another solution for that area. The wheel well on the front of my house will be covered by my solar panel awning so I'm not too concerned about doing anything there.
I connected with Taylor Metals who made my roof panels and flashing to see if they had any gutters to match my roof color. I learned that while they can make custom metal components, it is much easier and cost effective to buy generic gutter components. I decided to go with unpainted galvanized to add another visual element to the exterior. I'm sure there are more unique ways of creating a gutter and downspout system (like this one in Seattle) but I decided to keep it simple. I also considered installing a few connected rain barrels to the downspout but realized that a 55 gallon drum will fill up quickly and also drain quickly once a yard of plants needs watering. I have seen many people here use a rain barrel in conjunction with their disconnected downspouts mostly to direct water away from their homes, less so for watering plants in the summer. More effective would be a cistern which we are not planning to install on this site.
Installation was not too difficult with the aid of tin snips, a hacksaw, pliers and drill for the self-tapping screws which connected the pieces. I also used gutter sealant (which I'm pretty sure is just silicone) at the seams. I assembled the full gutter length on the ground (they come in 10' sections) and had a helper hold it in place while I screwed in the hidden hangers to attach the gutter to my fascia board. I waited a few days to install the downspout to ensure I had a good gutter slope. I cut the downspout to length with my circular saw and metal blade. I am impressed with my metal working progression. :)
I had a leftover section of gutter which was the perfect length for my bike/tool shed so I installed it on the low side after trimming the corrugated metal roof. I experimented with cutting a hole and installing a downspout drop there instead of buying another gutter section with the downspout drop already in place. Being inexperienced with gutter installs, I prefer to use the prefabricated component. 
I had looked into rain chains, found them expensive and not quite what I wanted so I decided to make my own. I purchased some stainless steel chain, nuts and bolts. Then, I cut off the tops of wine bottles left over from a party and stung them onto the chain upside down, sliding a bolt through a chain link and adding a nut to the end to let gravity hold the bottle in place. This was not quite the elegant design solution I was hoping for but it can be easily modified over time. I still need to shorten the chain at the bottom and add something at the base. I was thinking a watering can that would spray water onto the lawn.
Check out my flickr for more photos of yard projects!

Bike and Tool Shed

Happy Spring! Today I spent the morning at my volunteer gig with Friends of Trees, a local non-profit that brings the community together to plant and care for trees. We prepped for tomorrow's planting events of which I will be crew leading at one in a nearby neighborhood. So much fun! Then I walked back to my house and worked more soil to prep it for planting some native plants. I had already prepped and planted a section of the garden for some vegetables and yet another section awaits to be worked over. It's pretty exciting to see the garden transformations over time, especially after all the time spent pulling out weeds...especially the morning glory. For two people living on this site, there is abundant space for gardening which is why I am going to introduce some native plants and ground covers to lessen maintenance and to enhance aesthetics. Native plants are awesome because they adjust to the seasonal variations we experience, growing in wet, dry, cold and hot conditions without much help once established. The area I am creating will be outside my front door across the path so I will get to see it as I come and go.

Other than gardening, I built a small shed for my bike and tools over the tongue of my trailer. I used pier blocks as the foundation since they had worked well on our utility shed. I picked up cedar 4x4 posts and some cedar 2x4s from my favorite building materials place, BMR, along with some really cool old saw blades which I'm going to be using for my reclaimed wall project eventually.
I picked up some nuts, washers and bolts along with a couple of Simpson hardware brackets that I could use to attach the posts to the roof structure with bolts. Awesome find! I wanted to bolt the separate components together so that I could more easily take the structure apart for transport and reassemble. The pier blocks bolt to the posts which bolt to the roof structure. It's probably possible for one person to do themselves but for safety and ease, I enlisted my yardie, Eric, to help me with assembly.
But then I'm getting ahead of myself...Once I had all of the materials on site, I prepped the places for the two pier blocks by measuring off the trailer and house the desired distances and then digging out a shallow hole for each. I filled them in with a few inches of gravel, set the blocks in place, leveled them together and then continued on with the posts.
Since the posts were rough cut, I needed to notch each to receive the 3 1/2" wide post bracket. I've been getting pretty good at cutting with my circular saw so I used it to make the notches. It was a little bit tricky since I had to cut from both sides and then once on the face but it worked out just fine. I cut one post to 6 feet and the other to 8 feet and then 7'6" so it would closer match the slope of my house's roof.
I set each post in place to mark the location of the bolt hole then removed the posts and drilled the holes with a spade bit. I lined up the other Simpson brackets on the top side of the posts, drilled a hole for each and then attached them with the bolt, washer and nut. Next, I set the posts into the pier block brackets and bolted them in place.
To start the roof, I cut two 4' lengths of 2x4s and set them into the top brackets to mark and drill their bolt holes to temporarily position them in place while figuring out the slope. I braced a 2x4 to hold the posts the same distance apart as the pier blocks so they were plumb. The distance was shorter than 8 feet so I rested a 2x4 on top of the other 2x4s to mark the angle cut. Once I made the cuts on the two rafters, I test fitted them and then unbolted the two ends to put the roof structure together. I cut two 2x4s to place at approximately 24" o.c. to support the corrugated tin I had found for free on top.
I screwed the 2x4 frame together, squared it and then attached the corrugated tin with gasketed screws. When that was complete, we lifted it into place and secured the bolts. I added a couple of screws to attach the back 2x4 to my house so it would have a little bit more stability. 
Materials for this project cost $38. I found a used truck tool box on Craigslist for $140 so I U-bolted that to my trailer and packed in my tools. It's really great to have the extra floor space inside my house!

Modified Rock Climbing

Since it's my birthday month and I needed a more regular place to shower, I decided to get a rock gym membership. It has been a couple of years since I have been climbing regularly and though my favorite climbing buddy currently lives in Astoria, I decided it would be a fun way to get exercise and focus on a skill to reduce the stresses of tiny house building, work, etc. The gym I go to has a bouldering area and a rope area with top ropes, lead climbing and auto belays. The auto belays enable you to belay yourself while climbing via a mechanism at the top so you don't need to have a partner. They are pretty great except for not having the ability of more abruptly catching and stopping you if you fall so it is more difficult to get back on the wall when that happens. In the few weeks of climbing almost every other day, I have been able to go from a 5.7 to 5.10- which is the highest level I was able to climb previously. One of my current favorite routes is a 5.10- called "push it real good" which involves stemming and mantling up the wall, really fun!
Naturally, I decided that I should install some rock holds in my tiny house. I needed something to hold onto while climbing up and going down my loft ladder as well as something other than a ladder to open up the window above the door. So I went to a local outdoor store and scored some used holds. In this process, I learned that holds get anchored in two different ways: T-nuts with bolts or screws. Smaller holds are screwed in from the face of the wall and larger holds typically require T-nuts which must be installed in drilled out holes before the wall panel goes up. I bought larger holds so I could use them with more ease without climbing shoes. Unfortunately, I had installed my wall panels months ago and was not going to take them down to get access for the T-nut installation. So I decided to get some beefy lag screws and use them in place of the bolts. The downside of this technique is that I cannot easily tighten the screws over time like you can with the bolt system so I will either have to get longer screws or move the holds to new locations. I also might be able to drill holes and add secondary screws to add more structural strength. All of the holds are currently screwed into studs so we will see how they hold up over time!

Year End Wrap Up

After Settling In and building some storage in November, I took a break from house projects in December to focus on designing and finding materials for our shed structure which will house a washer, dryer, shower and electrical sub-panel. After bringing the materials to site and determining the desired location for the structure, we realized that we needed to move the travel trailer farther forward toward the street which would give us space to build between my house and the future tiny house at the front of the lot.
With limited space between the tongue of the trailer and the fence, we borrowed a power mover from some other tiny housers who have used it to move their homes. This is a homemade piece of equipment with small, fat wheels, a motor and pieces of steel that clamp onto the trailer tongue via bolts. One issue in using the power mover was that the travel trailer's tongue was of larger dimension tube steel than the bolt system was capable of so we had to connect it with other removable clamps. That worked as an ok connection but was one we had to keep an eye on and re-clamp multiple times after things shifted during the move. The other issue was, once again, the soft garden ground in rainy December. The trailer was too heavy for the wheels to gain traction on the ground, on plywood and even on gravel. After several attempts, we realized that the only way to move the trailer was to make it lighter which meant deconstructing it.
So we planned a d-con party which of course ended up being on a very soggy wet day. The day before was dry so Eric and I started removing some of the interior components. The day of, a couple of Eric's friends stopped by to help and together, they went to town with sawsalls, hammers, crowbars, shovels and the like to strip the travel trailer down to the frame. Eric had bought the trailer cheap with the intention of doing this eventually because he wanted to use the sturdy frame to build a tiny house on and also to possibly salvage some of the appliances. I played the role of fire master most of the day since having more than 2-3 people demoing it was dangerous and I didn't want to hurt myself since I would soon have 1 1/2 weeks off of work for a vacation (see below for more about that).
Once the trailer was stripped down to the bare frame, we called it a day and resumed trying to move it the following day. The power mover kind of worked but we again ran out of space so Eric grabbed the tongue and Johnny, one of his friends, and I pushed down and forward with the rear end. It still was really heavy but we got it moved out of the way to build the shed! We will be working on putting the structure together this month and getting things set up so we can run electrical out into the yard from the shop building. I am thinking that the site electrical and then my own house's electrical system will be a project for next month.
After moving the trailer on the weekend, I had a couple of days left of work for the year and then headed out on another desert adventure. It was my first time to the desert in the winter if you don't count the short trip I took to the John Day Fossil Beds over the long Thanksgiving weekend. It was a bit of a challenging trip since the weather wasn't quite what I had expected it to be, though I learned from some locals that it was colder and snowier than usual for this time of the year. 
I spent Christmas eve in Christmas Valley exploring some of the geologic features there; I wandered around the lost forest and sand dunes Christmas morning before heading to Hart Mountain where I had the hot springs and campground to myself until the following late morning. Then I headed over to the Steens Mountain and hot spring on the east side in the Alvord Desert. It saddened me to see that the spring has been more developed since the last time I was there. Now you have to pay $5 but it is on private property and apparently the alternative was bulldozing the existing structure. And, I did get to meet this guy Joe who is getting paid to manage the site while living out of a tiny home he built himself. You can read more about his story in Unlikely Lives
From there, I hiked at Borax hot springs and then stopped at Field's Station for a giant, delicious cheeseburger and fries before heading to Willow Hot Springs. The following day, I checked out the Pillars of Rome before attempting to get to Three Forks for the third time. The other two times, summer and fall wildfires prevented access and this time snow and an overflown creek from previous rains stopped me 11 miles down the road. One of these days I hope to get there to see that part of the Owyhee Canyon and check out the warm springs. 
After being cautioned to not attempt to get to Leslie Gulch (25-40 miles of gravel roads depending on route) due to the recent rains, I decided to try anyway since the ground seemed pretty hard from the cold temps. I did learn to be wary of puddles of unfrozen water under the snow and thin layers of ice but it wasn't really all that much different than winter driving in Minnesota, where I grew up. I really don't like the cold and the snow which is a significant part of the reason I moved to Portland in the first place. So while I felt I could travel in those conditions, I had hoped for warmer days and less snow. 
Anyway, I made it to Leslie Gulch and hiked some trails (including the one to my favorite known place in SE OR) on the way to the campground at the end where the gulch meets the Owyhee Canyon. I slept the night there (in my car as I did for most of the trip since it was usually too cold and windy in my opinion to set up a tent). I had noticed that the river level was really low so I decided to try hiking to Echo Rock hot spring a little over four miles in the canyon (You can only get to it during low water unless traveling by raft at higher water). The trail to the spring is a road best suited for ATV's or Jeeps, maybe some pickups but not really for Subaru's. I was glad to be on foot anyway since the weather was ok and I could enjoy the scenery and silence more. The hot spring was a little tricky to find since the small pool is left empty to avoid algae buildup. Once I found the constructed tub and the drain plug, I opened the fill valve and let the water fill the space while I wandered around a bit. 
It was really interesting to experience so many different developed and undeveloped hot springs during the trip. I soaked for a couple of hours until the wind picked up and it started snowing, then headed back to my car before dark. Not knowing what snowstorms are like in the desert, I decided to try to drive closer to a town so I wouldn't be completely alone 30+ miles away from anything. In the fading light and decreasing visibility due to the blowing snow, I drove to Succor Creek Campground and decided to take my chances and stay there for the night since I didn't feel safe to continue on 15 more miles of icy snow gravel roads with about 12 feet of visibility.
It snowed more that night but luckily not that much and I was able to drive to Snively hot springs near Lake Owyhee for a morning soak followed by a walk out onto what is usually the middle of the lake during normal water times. The day was one of the few sunny blue sky days of the trip so I took time to sit and bask in the sun on a rock usually many feet under water.
Then, I headed west to the Beulah Reservoir to spend the night and try to locate the last hot spring of the trip. After the coldest night yet and two hours driving around the next morning, I eventually did find the spring which was supposed to have been developed with a shed and bathtub, but it was in ruins. Disappointed, I left and headed into Burns to treat myself to hot coffee and a warm breakfast sandwhich before heading John Day for New Year's. I splurged and stayed at the Dreamer's Lodge there since I really needed a shower and wanted a warm place to spend the night since temps would likely go below zero again. I explored town a little and checked out the brewery before heading in for the night. 
The next morning, I found a free library (so Portland) before getting a pumpkin latte (one of my favorites) and driving on to Pendleton. The only other time I have visited Pendleton was during the round-up in September when the town is packed with crowds of people. This time it was just the opposite with many quiet shops and few people walking the streets. I decided to jump on the freeway to head west since it would be faster. Kind of last minute, I connected with a friend in Mosier who let me stay in his strawbale house that night which was a real treat since I want to build a strawbale home someday and it had been at least a couple of years since I had stayed there last. It was also great to reconnect with a fellow builder. The next day I wandered the streets of Hood River before heading back to Portland via a quick semi-frozen waterfall gorge hike on the way. It felt so good to come home to my little house!

Tiny House Move: Part 1

Last weekend, I moved my tiny house for the first time. It was a very emotional experience to say the least. Highs, lows, laughter, tears, frustration, learning opportunities, success. I hope to capture most of that in this post and in more photos on my flickr.

Day 1: Friday, October 31st
For Halloween, I was a tiny house mover. Dressed in a t-shirt, fleece, Carhartts and Danner work boots, I started the day by helping Eric (who I am renting my space from) pick up a beefy 3/4 ton diesel truck and move a travel trailer from Forest Grove to his place in inner NE Portland. I was happy to help provide moral support and also benefited in getting a feel for what it would be like towing my little house.
Once we dropped off the travel trailer at site, we drove up to Green Anchors in St. Johns where I have been building. My build buddy, Lina, met us on site to help pack up and take photos from the follow car. Once there, we got the house ready by loading the extra materials I had stored underneath and my stairs into the back of the truck. We checked the tightness of the lug nuts and swept the ground with a magnet to pick up stray nails, screws, staples, etc. The last thing I needed was a flat tire. Eric backed up the truck to line up the trailer's 2 5/16" ball hitch once we had jacked it up. We lowered the trailer onto the ball, then connected the chains and lights.
Everything went smoothly except the part when the front door was left open over the stairs and we started lowering the trailer onto the wheels. Part way down, someone noticed that the door looked like it was at a kind of funny angle. It had caught on the stairs and was starting to pull itself off the hinges. After a bit of a meltdown on my part (softened by a pumpkin shake Lina brought me), we decided to try to fix it and reinstall. We unscrewed the door from the hinges, set it on some stickers and chiseled the rough edges smooth. Lina went to ACE to pick up some new screws that were double the length of the old ones so they would be able to tie into the door and frame. Eric and Lina were rockstars and soon had the door securely back in it's place. I guess I'm lucky it didn't fall completely and shatter the glass.
Then, we were ready to go after checking the light and brake signals. I decided that I wanted to drive the truck at least part of the way so I jumped into the driver's seat. Of course this was an important photo op so Lina took lots of photos of me laughing at the absurdity of what I was doing (with the St. John's bridge in the background of course). Then Eric jumped in the truck with me to help guide the turns on the way to the bridge.
Once on the bridge, I took it slow to take in the beauty of the Gothic arches, the Willamette River, and so Lina could take photos. I'm sure other people trying to drive across the bridge were not appreciative of my slowness but I wasn't ready to drive fast quite yet anyway. Once across the bridge, we took Hwy 30 to the Fremont bridge which I did manage to cross going 50 mph. Once off our exit, we drove the short rest of the way to the new space. Towing my little house was actually not that difficult.
Getting it into the space was another story. Since we are in rainy season now and the land was last used as a garden, the soil was very soft and slick once compacted. I let Eric back the house in since I didn't feel confident taking on that challenge. As he carefully maneuvered the house up the slope through the gate, Lina and I helped guide. After a few attempts of getting the house and truck up the hill, the truck lost traction and started slipping sideways which was kind of terrifying considering it was attached to my house and because we had to be near to give directions. We tried adding pieces of wood and 1 1/4" thick plywood that we borrowed to gain more traction but were unsuccessful after hours of attempting. I decided to call one of the founders of Green Anchors to see if he had any ideas of what would possibly work to get the house in place. He suggested a come-along with chains and straps connecting the trailer to a tree behind to take some of the weight off the truck. It was dark by then but we decided to drive to get the tools, bring them back to site, set everything up and go for it.
We tried using this system with the truck several times but were unsuccessful. We thought about unhooking the truck and trying to just use the come-along to move the house but then realized that wouldn't work since the tongue wouldn't be supported. At that point in the evening, we decided to stop and pick it up again the next morning.

Day 2: Saturday
On Saturday morning, Eric took the truck to go pick up some 3/4 minus gravel for the driveway since we had decided it would be our best option for traction. While he did this, I packed up one of his vans with my futon frame, mattress, extra door and propane stove and then met him to help unload.
Once that was complete, we reconnected the truck and trailer and Eric backed in without much resistance from the tires. The gravel did its job in getting us to flatter ground. We laid down some of the thick pieces of plywood for the truck to drive over and not get stuck in mud. That worked pretty well though we had to keep rearranging the pieces of plywood as the truck backed in. We decided to un-hitch and re-hitch once to get a better angle so the house would be close to parallel with the adjacent building.
With my house finally in its new place, we quickly backed in Eric's travel trailer so we could get the truck back to the rental place. They weren't happy that we returned it late but there wasn't much else we could have done due to the mud issues. Back at site, I started to level the house with my scissor jacks setting on top of the thick pieces of plywood on top of the ground. I used a car jack to jack up one corner at a time. The problem with soft ground and the scissor jacks is that they are meant to stabilize but don't do well on ground that had not been compacted. When I would try to lower the house onto the jacks, the compensation for the vertical compression and lateral sliding was too great so they started deforming.
After a few unsuccessful hours of trying to get the jacks in place, I decided to call Lina so see what she thought might work. She mentioned that hers is on some beefy timbers. I didn't have timbers easily available but I did have access to some CMU blocks left behind by a former gardener. So we decided that it might work to dig out the ground a little bit, put a couple of blocks in, a layer of plywood and then jacks on top of that. It seemed to be working for the first three jacks but then the whole back end shifted again with the last one which might be broken at this point. It was getting late at that time and I decided that 7 hours spent trying to jack up the house was enough for the day so I went home.

Stay tuned for Part 2...

Trim, Flooring, Shower Pan, Etc.

I feel like I'm in architecture school again. I'm in that final stretch of working on my project to get it "done enough" for the final review with late nights in the studio after days of classes and work. Not getting enough sleep or proper nutrition or doing much of any self care. In college, I was able to pass out for hours, days after the review. I wish that were the case this time...
If you haven't guessed yet, I'm getting ready to move my tiny house to its next location and start living in it while I continue the finish work. May as well keep in the tradition of other tiny housers. I had really wanted to get the plumbing and electrical in by the time I moved, but realized that I needed to take care of the trim, flooring and shower pan first. And my new site isn't quite ready with plumbing and electrical hookups anyway (I'll be helping install them). So it will kind of be like camping which is great since I didn't have the time to do that this summer.
After trimming out my windows, I decided to start on the floor. I had picked up some 1x4 Doug Fir T&G flooring from BMR (can you guess one of the themes of my home?) when I bought the trim. I had a friend start helping me install the first few rows of flooring. We started against the wall with the door since I wanted to pick out the clearer pieces to use for the main path first. We needed to notch out the pieces around the wheel well, but that was not too difficult to do with a table saw and jigsaw. We ran a bead of construction adhesive on the floor under each piece and then nailed four 2" 18 gauge nails through the tongue of each piece to secure them to the subfloor. Once the first row was set, the next went faster. We staggered the seams in each row and made a three row pattern. Looking at it finished, I kind of wish we had done more staggering but that would have been difficult to do with boards that were only 3' long.
I continued working by myself for the rest of the floor, carefully selecting each piece of wood since they were seconds (but cheap at $.50 a foot for CVG or close to it!). Once I had all of the pieces in place, it was time to sand. I thought I would need to use a portable hand belt sander. In larger spaces, you can rent those large drum sanders, but I didn't think it would make sense for my house especially since it wouldn't fit under the sink or loft ladder. It was dark outside while I was sanding and so I sanded under two work lamps. The belt sander is a powerful tool, one that took away more material than I realized until I had made three passes with 80, 120 and 150 grit sandpaper. It had created some small (but at the time seemed large) gouges in the floor. I decided to use an orbital sander to try to even them out and made some progress but realized I should have just used that tool from the start. I had been frustrated from shower pan stuff (see below) and I just didn't really know what I was doing so messing up the floor a bit was annoying as well. But people pay good money for the reclaimed look and now I won't be as worried about marking up the floor. After the sanding, I added 3 coats of satin Zar Ultra Max waterborne oil modified polyurethane as recommended by the guys at Woodcrafters.
Meanwhile, Rory was working on my shower pan. I took the measurements, handed Rory my drain and he ended up bringing them to Schmeer Sheet Metal so get the pan made since they have a larger brake than Rory does. They used stainless steel as the material. I'm not really sure of the whole process since I wasn't there but they did a great job because it fit in the space! If I did it again, I would get the pan made and then frame the wall around it. Kevin, the other welder on site, had told me to put the wall in first so we could get the pan measured, so that's what I did. I had thought they messed up with the hole size since it was one of those days so Rory's dad made the hole a little larger. Then I realized that the drain actually attached a different way and the cutting was all for nothing. Luckily there is still about 1/4" of material around the edge which should be enough for plumbers putty. I'm going to silicone caulk around the edge too.
With all of that happening, I was also cutting, sanding, coating and installing my door, crown and baseboard trim. I have learned that trim prep and finish work in general takes a long time, especially if you are only working on it nights and weekends.
I haven't been taking many photos of what I've been up to since it's crunch time but here are some of the trim, flooring and bath pan ones in my flickr albums.

Kitchen Farm Sink

This spring, before I started my build, I found a stainless steel double basin sink at the ReBuilding Center for $24. Since many tiny housers start their build with a sink, I figured I may as well too. I had planned to make a cutting board to rest over one of the basins which would also contain the dish rack. That way I would have flexibility in space use since I was not planning to install another sink in the bathroom.
I really wanted to find an old cast iron farm sink with drainboard but had no luck in finding one at the time. So I kept passively looking and then stumbled across one a little over a month ago at BMR just before I was about to check out. It was resting near the front of the store away from the rest of the sinks so it must have just recently arrived. I stopped and stared at it for a minute, thinking "huh, I think this is my sink." At $95 it was more expensive than my other sink but my other sink would have required a butcher block countertop that I had planned to make. With the sink basin on the left side and drainboard on the right side, it fit in with my house design. It even came with a unique wall-mounted faucet (more about that below).
So I decided to buy it. I learned later that several other people had come back to buy it after I did so I felt lucky I chose to make the trip there when I did. (I found two similar sinks the following week but each had a center basin flanked by drainboards). I took it back to site and set it on a folding table in it's eventual place. There is about a 7" gap on the left side between it and the bathroom wall that presents a new design opportunity for some kind of pantry and/or dish storage with shelves/hooks/etc. On the right side, I will build or find a small cabinet with a drawer and shelves for cookware.
But before that, I needed to figure out if the faucet would be usable. (I found the patent number, looked it up and found it was from 1945!) Whoever removed it, cut the copper supply pipes off so short that I was told by most people would render it useless. If I could not use it, I learned that a replacement would be difficult, if not impossible to find due to it's unique quality of the supply coming in through a central hole in the backsplash wall. For some reason, a second hole was cut in the backsplash behind one of the faucet "wings" and no one has had a good explanation of that. I could not find any new faucets with this single hole design, most wall-mounted faucets are now designed with two separate holes 6-8" apart. If I used a new faucet, it would mean that I would have to drill another hole into the porcelain/cast iron backsplash. I did not feel comfortable doing that so I kept asking around at the reuse stores.
Finally, I went to Hippo Hardware which specializes in antique hardware. I figured if anyone could help, it would be them. I talked to a guy in the plumbing section who looked at the faucet, took it apart to check out the condition of the components. He said it was in pretty good condition and could probably work with some new gaskets if I could find someone to braise on new supply pipes. I thought about who I might know and trust to accomplish that task and then asked Kevin on site who had welded my loft joists. He looked at it and told me that if I could get the body separated from the rest, he would try to make it happen.
I had other house projects that were more pressing so I set it aside for the time being. Kevin came by an hour later and said, "Let me see that faucet." I gave it to him and went back to work. A few hours later, I needed to leave and let Kevin know. He went to get the faucet and handed it over to me pipes braised and internal components replaced! I haven't tried it yet since my plumbing isn't in but my fingers are crossed that it will work.
Next, I worked with Rory to design and build some steel sink brackets to cantilever it similar to the loft ladder. I had originally thought I would need a steel cube wireframe structure but Rory reminded me of the strength of steel. Apparently some old cast iron sinks were hung from special brackets but I figured the chances of me finding ones that would match my sink were slim. So he made two really beefy brackets out of 3/8" x 1 1/2" steel. They started out as L's and he thought about adding a small triangle gusset to each but I thought a diagonal support would be better. He thought that piece as an arch would look better so I told him to go for it.
Once Rory cut, drilled and welded the pieces together and I had marked out their locations on the wall (ensuring space for water heater and fridge below), we set one in place to mark the location of the top hole, then removed it and predrilled a hole for a hanger bolt. I installed the hanger bolt, then we put the bracket in place, plumbed it, and added a temporary screw in the bottom hole. Next, we leveled over for the other bracket and repeated the process. Then, we set the sink on top to line up the edges so we could mark where the holes in the sink would need to be drilled into the horizontal section of the brackets. This was a tricky process since we could only do one at a time and space was tight since we had to mark from the top. I tried spraying paint through the hole of the sink onto the bracket but that plan failed since the paint spread beyond the hole opening. I tried drawing a line with a short pencil around the flange of the hole so when we removed the sink, I could more accurately locate the hole with measurements. That worked much better. Once one side was done, we added temporary bolts to secure the sink to the bracket so we could mark the second side. All went well except one of the holes was slightly off but Rory just drilled a larger hole so it was fine.
We took everything apart to Rory could sand and lacquer the brackets and I could add the remaining 4 hanger bolts. Once the brackets were dry, we put it all back together without much difficulty. Now I can start installing the plumbing! For more photos, check out my flickr!

Doug Fir Ladder Treads

One of the projects this past week was cutting, sanding and clear coating my Doug Fir loft ladder treads. I found the material at BMR where I found the Fir for my ceiling and loft walls. Rory, who welded the steel support structure, thought it might look interesting to start with shorter treads at the bottom and make each progressive one 1/2" longer to the top so they would create a slight angle and offer more support at the top. I thought about this idea but decided I would rather them all be the same length. It was beneficial to have the steel component installed for some time before deciding on the tread length so I could figure out how long they needed to be. I decided to cut them to 16" since I wanted to overhang them a little out from the steel supports which are 14" long.
Once I cut the treads to length, I sanded them with 100 grit and then 150 grit sandpaper. Then I applied a coat of General Finishes Arm-R-Seal oil and urethane topcoat which I used on the loft floor and ceiling/wall T&G Fir. This finish is not meant for heavy traffic but I figured I would try it out for the treads since I do not plan to wear shoes when climbing up there. The other option would be to use a flooring finish but since I don't have that material yet, I am waiting to figure out what I will need. After drying, I sanded them with 400 grit sandpaper and repeated the process until I had applied 3 coats.
For installation, I decided to leave a space between the end of the tread and the wall since I need to add a piece of trim to cover the gap between the wall board and the diagonal steel support and since the weld joint would require either sanding or a mitered corner. I used a piece of 1/2" plywood as a spacer both for the wall gap and for the amount of overhang on the face. The treads are 5/4"x4" nominal so 1" x 3 1/2" actual dimensions and the steel surface is 2 1/2" which makes for a 1/2" overhang on the front and back of the tread. I used clamps to hold the wood in place while I drilled holes for the screws into the bottom of the tread.
I drilled one hole on each end first and then drove a screw in to set the tread in place. Then I removed the clamps, drilled and drove in the remaining screws. I used #12 x 1" sheet metal screws which is the same diameter as I used to secure the diagonal support and loft joists to the walls. Rory had thought about adding a piece of steel on the top of the horizontal steel pieces to create a key which would require a channel routered into the wood that would in theory keep it in place better over time. I decided this added extra steps to the process that I didn't feel were necessary since each tread has 6 screws so they should be set and I can always replace them over time if needed.
It's so rewarding to see this idea come to fruition. Yay design/build! For more photos, check out my flickr!

Interior Wall Finish

Since I had some Doug Fir T&G left over from the ceiling, I decided to see if I had enough to use it for my loft walls to differentiate the space from the area below. I liked the idea and feel of the material wrapping the space. Luckily I had been careful about minimizing waste so I had just enough with a few pieces left over for the side walls.
As much as I love wood and T&G though, I decided to incorporate some color in the remaining walls. Typically drywall aka Sheetrock is used for interior wall covering which is mudded and taped before priming and painting. Drywall, however, is heavy and cracks somewhat easily which are two negatives for a tiny house on wheels. Plywood is lighter and more flexible which makes it a better choice.
CDX plywood used for exterior sheathing has a rough finish. ACX plywood has a smooth, paintable finish on one side (the A side). However, I learned that ACX can be more expensive than veneer plywood which has a nicer, smoother finish. I found 1/2" Birch plywood sheets at Shurway for $35 a sheet which is a great price in town. I ordered 11 sheets and had them along with the Fir plywood dropped off at site for $15 since they gave me a deal for building in the neighborhood which was awesome!
I started with the end walls, cutting pieces to fit with a circular saw. I began installing them with a nail gun and finish nails but realized later as I was setting them that they weren't tying the sheathing to the wall well so I decided to use drywall screws at about 8" o.c. Those worked much better. Once I had secured the pieces, I spackled the screw heads and seams since leaving a small expansion and contraction gap seemed like a good idea. The problem is that the larger the gap, the more difficult it is to cover up. I kept the gaps smaller after the first wall. Once the spackle dried, I sanded off the excess, brushed off the surface and started priming with Z-Prime Plus, a special primer for plywood to avoid staining.
Once the stain dried, I started painting. A friend had mentioned using Cape Cod nautical blues like some boats do. I think blue is a good calming color for a small space so I went to Rodda Paint, looked at some paint chips and decided on two different colors, one for the end walls and one for the long walls.
I chose Horizon low VOC paint since I wanted to minimize the amount of toxic chemicals in the house that off-gass over time. I also chose a satin finish to match the existing finish in the house. The end wall blue is called Devine Current.
I really like the way it looks in the space. Someone mentioned it might look better slightly darker which I thought about until I painted the long walls with a lighter blue called Atmospheric Pressure. The lighter paint looks a little purple depending on the light but I am happy with it. The beauty of paint is that the color can easily be changed.
For more photos, check out my flickr!